
A practical guide to tile installation, matching terrazzo joint strips, and seamless-looking surface finishing
Precast epoxy terrazzo combines the design flexibility of epoxy resin with the manufacturing consistency of factory-produced terrazzo slabs. It offers a practical solution for commercial interiors where durability, appearance, and installation efficiency are important.
However, one challenge can affect the final appearance: the joints between individual slabs. Even when the terrazzo pattern and color are carefully matched, visible joint lines may interrupt the continuity of the finished floor.
Can precast epoxy terrazzo be installed to achieve an appearance similar to Poured-in-Place Epoxy Terrazzo?
At PreTerra, we have been exploring a seam-minimization method that combines conventional tile-style installation with matching terrazzo strips, epoxy bonding, and subsequent overall grinding and polishing. The objective is to reduce the visual prominence of joints while retaining the practical advantages of precast terrazzo.
This article explains the method, its main installation stages, and the technical considerations that should be addressed before applying it to a project.
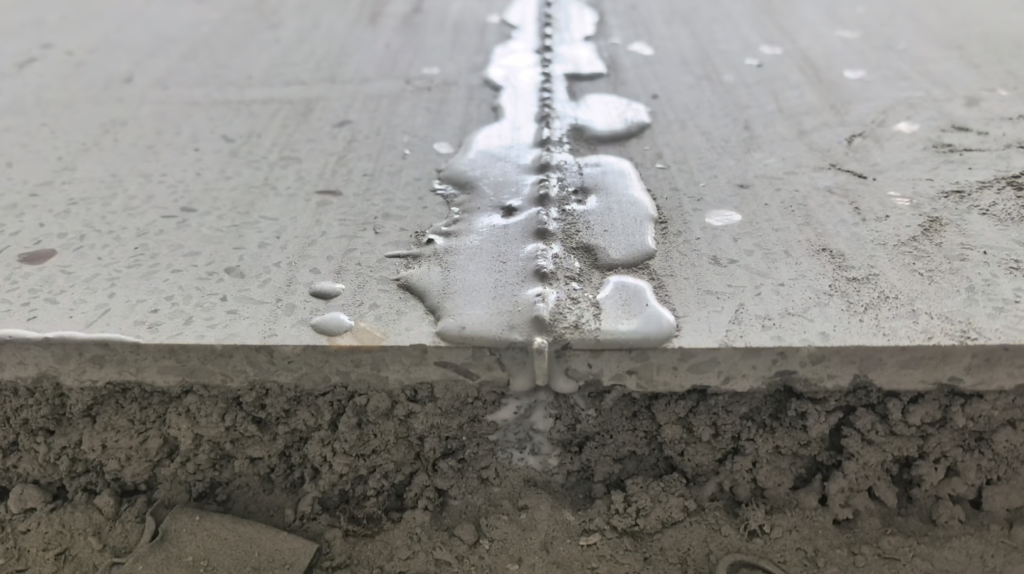
1. Understanding the Seam-Minimization Concept
Traditional precast terrazzo installation involves placing individual slabs on a prepared substrate and treating the joints between them. Depending on the joint material, color, installation quality, and final surface treatment, these joints may remain visible after completion.
The seam-minimization method described here takes a different approach. Instead of relying on joint filler alone, it uses a narrow strip cut from the same type of precast epoxy terrazzo as the installed slabs.
The process consists of five main stages:
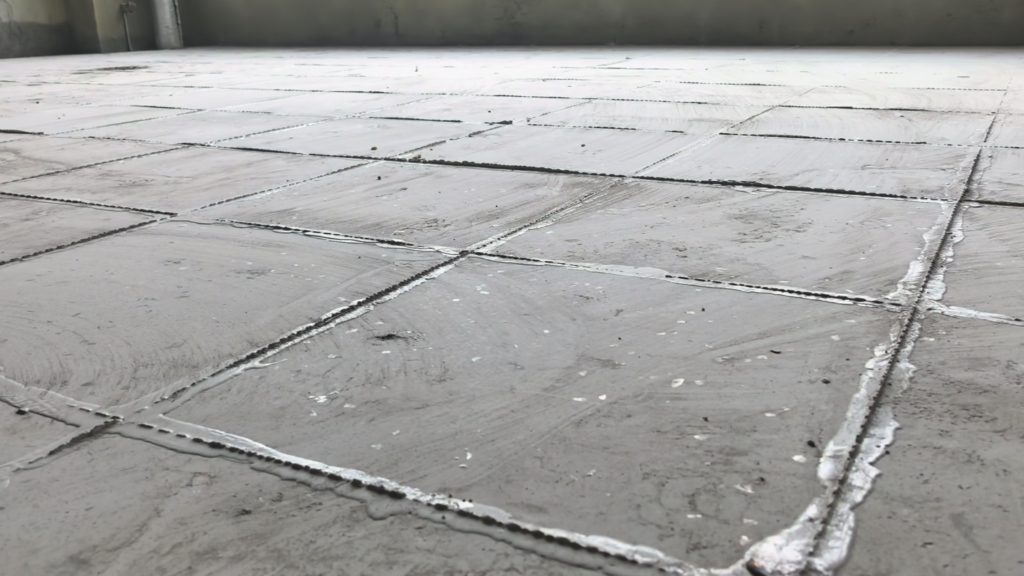
Install the precast epoxy terrazzo slabs in a tile-style layout.
Maintain an approximately 3 mm gap between adjacent slabs.
Apply epoxy joint adhesive and immediately insert a matching 3 mm-wide terrazzo strip.
Allow the adhesive to cure completely.
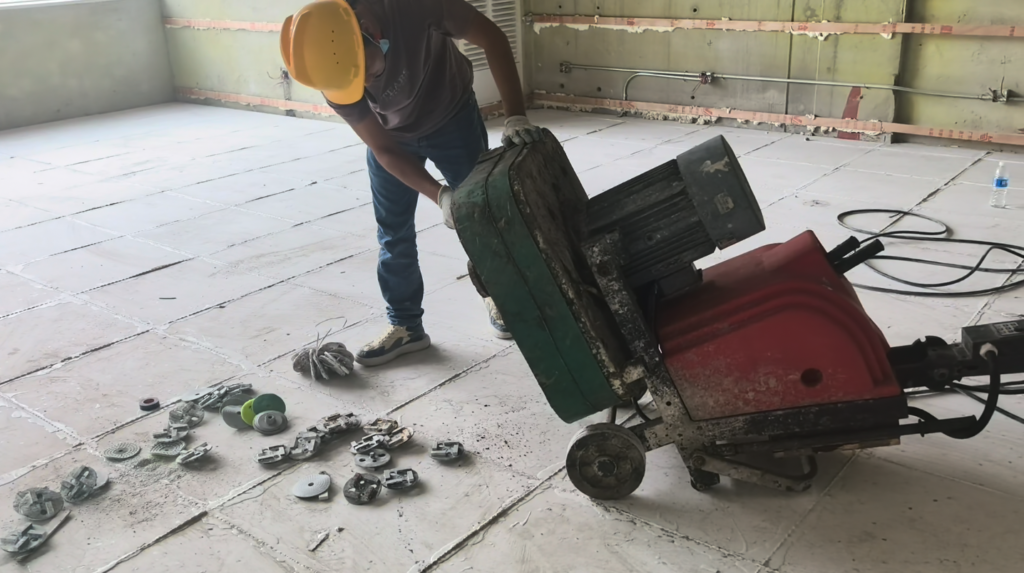
Grind and polish the installed surface to create a visually continuous finish.
The matching strip occupies most of the joint space. The epoxy adhesive primarily bonds the strip to the adjacent slabs by filling the small gaps between their respective edges.
This is an important distinction: the method uses matching terrazzo material to minimize the visible joint, rather than using exposed epoxy resin as the primary joint filler.
2. Substrate Preparation and Tile Installation
A visually continuous finish begins with a properly prepared substrate. Differences in slab height, inadequate bonding, or substrate movement can compromise the appearance and performance of the completed floor.
2.1 Inspect the substrate
Before installation, check that the substrate meets the requirements of the selected installation system.
Key considerations include:
Surface flatness and levelness
Cleanliness and freedom from dust, oil, and loose material
Substrate strength and suitability for bonding
Moisture conditions and compatibility with the selected adhesive
Existing construction joints and potential movement
Any necessary preparation should be completed before the terrazzo slabs are installed.
2.2 Select a compatible tile adhesive
Precast epoxy terrazzo slabs can be installed using a tile-style installation method, provided that the selected bedding adhesive is suitable for the substrate, slab dimensions, service conditions, and expected loads.
The adhesive should provide adequate bonding and support while helping to minimize voids beneath the slabs.
Compatibility should be confirmed among the terrazzo backing, adhesive, substrate, and any relevant primer or waterproofing layer. The manufacturer’s technical data should be followed for application thickness, working time, curing conditions, and substrate preparation.
2.3 Position and align the slabs
Lay out the slabs according to the approved design and installation plan. Maintain consistent joint widths and carefully control lippage, which refers to height differences between adjacent slabs.
For the seam-minimization method described in this article, the target joint width is approximately 3 mm.
The slabs should be securely bedded and sufficiently stable before joint treatment begins. Accurate alignment at this stage reduces the amount of correction required during final grinding.
3. Treating the Joints with Matching Terrazzo Strips
This is the defining stage of the method.
Rather than filling the entire joint with colored resin or conventional grout, a narrow strip of matching precast epoxy terrazzo is inserted into the gap between adjacent slabs.
Step 1: Prepare the joint
Inspect the joints and remove loose particles, dust, adhesive residue, and other contaminants that could interfere with bonding.
The joint should have sufficient and consistent space for the matching strip and the epoxy adhesive. The strip must be dimensionally suitable for the actual joint.
Step 2: Apply the epoxy joint adhesive
Apply a compatible epoxy resin adhesive into the joint.
The adhesive should be selected for its bonding performance, working time, viscosity, and compatibility with the terrazzo material. The joint surfaces must be prepared according to the adhesive manufacturer’s requirements.
The purpose of this adhesive is primarily to bond the matching strip to the two adjacent terrazzo slabs.
Step 3: Insert the matching terrazzo strip
Immediately after applying the adhesive, insert a factory-cut strip approximately 3 mm wide, made from the same type of precast epoxy terrazzo.
The strip is intended to fill most of the joint space. As it is inserted, excess adhesive is displaced from the joint, leaving the adhesive to occupy the small gaps between the strip and the slab edges.
The strip should be properly seated and aligned with the surrounding surface. Care is required to avoid damaging its edges or disturbing the installed slabs.
Because the strip is made from matching terrazzo rather than a separate grout or filler material, its color and aggregate appearance can be better coordinated with the surrounding slabs.
Actual color and aggregate continuity will depend on the selected material, strip fabrication, slab layout, and installation workmanship.
Step 4: Allow the adhesive to cure completely
After insertion, allow the epoxy adhesive to cure fully before grinding or polishing.
The required curing time depends on the adhesive formulation, ambient temperature, substrate conditions, and product instructions. The joint must have developed sufficient strength to withstand the subsequent grinding process.
Grinding too early may loosen the strip, damage the joint, or compromise the bond.
4. Overall Grinding and Polishing
Once the adhesive has cured completely, the installed slabs and joint areas can undergo overall surface grinding and polishing.
This stage helps bring the surface into a more uniform plane and reduces differences in appearance between the original slab surfaces and the treated joints.
4.1 Initial grinding
Begin with an appropriate grinding process to address surface irregularities and minor height differences.
The abrasive selection should reflect the condition of the installed surface and the characteristics of the terrazzo. Excessively aggressive grinding can damage the aggregate exposure or create unnecessary material removal.
4.2 Progressive grinding
Continue with progressively finer abrasives to refine the surface and improve visual uniformity.
The grinding sequence should be established through a representative mock-up. It will depend on the terrazzo formulation, aggregate type, slab thickness, desired finish, and equipment used.
Particular attention should be paid to the joint areas to check for pinholes, edge damage, differential wear, and visible lines.
4.3 Final polishing
Complete the surface treatment using a polishing process appropriate to the specified finish.
The objective is to achieve a consistent appearance across the slabs and treated joints, with the matching strips blending into the surrounding terrazzo as naturally as possible.
The final result depends on the quality of the precast slabs, joint preparation, adhesive bonding, curing, grinding, and polishing. The method is intended to minimize visible joints, not to guarantee that every joint will be completely undetectable under all lighting conditions.
5. Quality Control and Performance Verification
A successful installation should be assessed on more than appearance alone.
The following items should be included in project-specific quality control.
Joint appearance: Check the visibility of joint lines under representative lighting and viewing conditions.
Surface flatness: Inspect for lippage and unevenness between adjacent slabs.
Bonding integrity: Check for loose strips, debonding, cracking, and other signs of inadequate adhesion.
Surface finish: Look for scratches, pinholes, edge damage, uneven aggregate exposure, and inconsistent gloss.
Dimensional consistency: Confirm that joint widths and strip dimensions are suitable for the installation system.
Long-term performance: Evaluate the resistance of the joint system to expected traffic, cleaning, temperature variation, and other relevant service conditions.
At PreTerra, preliminary trials of this approach have achieved a promising visual result, with the treated joints becoming difficult to distinguish during ordinary viewing. However, long-term durability testing is still ongoing. The method should therefore be validated through representative mock-ups and appropriate performance testing before being specified for demanding or large-scale projects.
6. Important Installation Considerations
Material compatibility
The epoxy joint adhesive must bond effectively to the specific terrazzo material and prepared joint surfaces. Adhesive selection should be based on technical data and practical testing rather than color matching alone.
Consistent strip fabrication
The matching strips should be cut accurately and handled carefully. Variations in width, edge quality, or aggregate distribution can affect both installation and final appearance.
Curing and environmental conditions
Temperature and other environmental conditions may influence adhesive working time and curing. The installation team should follow the applicable product instructions and avoid grinding before the adhesive has fully cured.
Movement joints must remain functional
The seam-minimization method is intended for suitable joints between adjacent slabs. It must not be used to rigidly bridge structural movement joints, expansion joints, isolation joints, or other joints designed to accommodate movement.
These joints must retain their required movement capability and be detailed according to the project design and applicable installation requirements.
Project-specific mock-ups
Before full-scale installation, prepare a mock-up using the actual terrazzo slabs, matching strips, adhesive, installation equipment, and grinding sequence.
The mock-up should be used to evaluate appearance, workability, bonding, surface treatment, and the proposed acceptance criteria. Where long-term performance is critical, additional testing is necessary.
7. Precast Epoxy Terrazzo and Poured-in-Place Epoxy Terrazzo
Precast epoxy terrazzo and Poured-in-Place Epoxy Terrazzo offer different approaches to achieving a terrazzo finish.
Precast systems use factory-produced slabs, which can support controlled manufacturing, repeatable dimensions, and a modular installation process.
Poured-in-Place Epoxy Terrazzo is installed and finished on site as a continuous system, subject to the project specification and installation conditions.
The seam-minimization method described in this article aims to bring an important visual benefit of site-installed terrazzo—surface continuity—to precast epoxy terrazzo installations.
It does not make the two systems identical. Their installation requirements, joint details, substrate considerations, and performance characteristics remain different. The suitability of each system should be evaluated against the design, site conditions, programme, and project requirements.
Conclusion
Achieving a seamless-looking finish with precast epoxy terrazzo requires more than careful slab placement. Joint design, matching materials, adhesive bonding, curing, and overall surface finishing all contribute to the final appearance.
By inserting a matching 3 mm-wide precast epoxy terrazzo strip into an approximately 3 mm joint, bonding it with epoxy adhesive, and grinding and polishing the surface after full curing, the seam-minimization method described here offers a practical approach to reducing visible joint lines.
The method shows potential for projects seeking the manufacturing advantages of precast terrazzo alongside a visually continuous finished surface. Its suitability and long-term performance should be established through project-specific mock-ups and testing.
Looking for precast epoxy terrazzo solutions for your next project?
PreTerra provides epoxy-based flooring materials and technical support for project teams exploring precast and Poured-in-Place Epoxy Terrazzo systems.
Contact our team to discuss material selection, installation requirements, and project-specific technical considerations.